- Thread starter
- #1
bigunitcards
Member
Some quick background - I think jersey letter patch sets are awesome for player collections, especially when you're trying to display your set at home. Randy Johnson had letter patches in 2007 Topps Sterling; Beckett lists 4 cards #d /7. I've only seen pictures of 2 letters both #'d 1/1, so my guess is there where just 4 'JOHNSON' sets made. And the biggest RJ collector I know only has 2 letters total. There is also a 'BIG UNIT' faux letter patch set in '09 SP Authentic. Again, only 3 sets made & issued during a year I was inactive in the hobby. Plus they're SF Giants cards which I'm meh about. So basically I am never going to be able to do this:

(on eBay for $750/OBO)
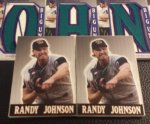
I use Photoshop regularly at work, and have access to a nice printer & heavy duty paper cutter so I made it a project to construct my own letter patch cards from one of my stained Arizona jerseys. I modeled the card after the 2006 SP Authentic By the Letter set, but did BIG UNIT vertically instead of LETTER. Pretty plain card back since these are going to end up on a wall display. I don't know what type of paper I used, but it's the kind that is sort of stretchy like decal material - if you tried to rip it, it would stretch the paper. I made the images bigger than a trading card so when I cut them out there wouldn't be any white showing, I figured that out after the 1st attempt.

Using the paper cutter I cut small strips of heavy cardstock paper, again I don't know the technical name or type, but it was on the art canvas aisle at a craft store. The thickness of about 4 normal cheap trading cards. Having a machine that could die cut or stamp out squares in cardboard paper would have made this more precise but you gotta work with what you have.

Using alot of poster paper glue I built up the edges 2 strips high.

Inserting the cut letters

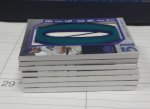
Glued the card top on after using an exacto knife to cut the window. As a finishing touch I glued on small strips on the sides of the card to hide the layers since they aren't all that precise like a real card. They ended up being almost exactly the same thickness as a Sweet Spot card.


And to complete the work, I #/d them all 1 of 1.

And done! Costs were about $20 for supplies plus sacrificing a dirty jersey. Took about 4 hours for the construction. The only real goof I made was trimming the Os a tad too much. I thought about reprinting the card fronts to have a smaller window to cover it up but it won't be that noticable on the wall in acrylic holders. Anyways it was just a fun little afternoon project that came out pretty good for a 1st attempt. I've been dropping alot of $ lately on some premium cards so this a way to keep collecting while taking a break from spending.

(on eBay for $750/OBO)
I use Photoshop regularly at work, and have access to a nice printer & heavy duty paper cutter so I made it a project to construct my own letter patch cards from one of my stained Arizona jerseys. I modeled the card after the 2006 SP Authentic By the Letter set, but did BIG UNIT vertically instead of LETTER. Pretty plain card back since these are going to end up on a wall display. I don't know what type of paper I used, but it's the kind that is sort of stretchy like decal material - if you tried to rip it, it would stretch the paper. I made the images bigger than a trading card so when I cut them out there wouldn't be any white showing, I figured that out after the 1st attempt.
Using the paper cutter I cut small strips of heavy cardstock paper, again I don't know the technical name or type, but it was on the art canvas aisle at a craft store. The thickness of about 4 normal cheap trading cards. Having a machine that could die cut or stamp out squares in cardboard paper would have made this more precise but you gotta work with what you have.
Using alot of poster paper glue I built up the edges 2 strips high.
Inserting the cut letters
Glued the card top on after using an exacto knife to cut the window. As a finishing touch I glued on small strips on the sides of the card to hide the layers since they aren't all that precise like a real card. They ended up being almost exactly the same thickness as a Sweet Spot card.
And to complete the work, I #/d them all 1 of 1.
And done! Costs were about $20 for supplies plus sacrificing a dirty jersey. Took about 4 hours for the construction. The only real goof I made was trimming the Os a tad too much. I thought about reprinting the card fronts to have a smaller window to cover it up but it won't be that noticable on the wall in acrylic holders. Anyways it was just a fun little afternoon project that came out pretty good for a 1st attempt. I've been dropping alot of $ lately on some premium cards so this a way to keep collecting while taking a break from spending.