
- Thread starter
- #1
200lbhockeyplayer
Active member
- Aug 10, 2008
- 11,049
- 2
Making customs is something I've done for years, and while some things have changed, people always seem to be curious as to what goes on. And for the record, the first custom I did was a for an old friend in a band probably 10 years ago...a piece of leather from his mask embedded into a card.
Step 1. The Components
Authentic autographs, front and back graphics and a piece of cardstock/board.

Step 2. Sizing the autographs
A standard card is 3.5" X 2.5" and you have to size and space the autographs correctly to fit. As shown in the picture, it becomes a "Frankenstein" almost of sliced and diced 3x5s. In this example, I had a mere 1/12" over "cover" in between the autographs, and I didn't want the seam between the signatures to shown. As they say...measure twice, cut once. Sometimes you're working with autographs that are in the thousands of dollars...you can't afford a screw up.

Step 3. Check the layout of the autographs
Always confirm that what you are doing still looks right. A half an inch off one way of the other could be a huge problem. In this case, I needed to constantly verify the thin artwork between the signatures would cover the seam.

Step 4. Secure the autographs
The last thing you want is to have the autographs move as you are applying the artwork with adhesive. Tape down and secure what you can, but make certain the tape does not touch the actual "card" area (the final 3.5 x 2.5") or it will create a ridge.

Step 5. Adhere the artwork
I build these in steps to allow for both sides to cure before affixing them to each other. Here you'll see the two halves of the card.

Step 6. Mount sides together...and wait.
With both sides now together with adhesive, you need to hold them firmly in place. Stacks of books work, but clamps are better.

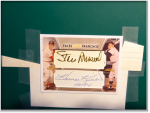
Step 7. Unveiling
Once the adhesive has been given enough time to cure, removing the clamps and finally seeing it in its complete, but raw form and ready to be cut down to size.

Step 8. Free at last
The final step, cutting the card free from its "bleed" frame.

Step 9. Enjoy it.
I look at building customs as a hobby, within a hobby, within a hobby. And at the most raw level, it's a craft and you have to enjoy it. If you skimp on any aspect of the process, the whole process isn't worth it.Time, patience, and nit-picking are the top three commodities.
Step 1. The Components
Authentic autographs, front and back graphics and a piece of cardstock/board.
Step 2. Sizing the autographs
A standard card is 3.5" X 2.5" and you have to size and space the autographs correctly to fit. As shown in the picture, it becomes a "Frankenstein" almost of sliced and diced 3x5s. In this example, I had a mere 1/12" over "cover" in between the autographs, and I didn't want the seam between the signatures to shown. As they say...measure twice, cut once. Sometimes you're working with autographs that are in the thousands of dollars...you can't afford a screw up.
Step 3. Check the layout of the autographs
Always confirm that what you are doing still looks right. A half an inch off one way of the other could be a huge problem. In this case, I needed to constantly verify the thin artwork between the signatures would cover the seam.
Step 4. Secure the autographs
The last thing you want is to have the autographs move as you are applying the artwork with adhesive. Tape down and secure what you can, but make certain the tape does not touch the actual "card" area (the final 3.5 x 2.5") or it will create a ridge.
Step 5. Adhere the artwork
I build these in steps to allow for both sides to cure before affixing them to each other. Here you'll see the two halves of the card.
Step 6. Mount sides together...and wait.
With both sides now together with adhesive, you need to hold them firmly in place. Stacks of books work, but clamps are better.
Step 7. Unveiling
Once the adhesive has been given enough time to cure, removing the clamps and finally seeing it in its complete, but raw form and ready to be cut down to size.
Step 8. Free at last
The final step, cutting the card free from its "bleed" frame.
Step 9. Enjoy it.
I look at building customs as a hobby, within a hobby, within a hobby. And at the most raw level, it's a craft and you have to enjoy it. If you skimp on any aspect of the process, the whole process isn't worth it.Time, patience, and nit-picking are the top three commodities.
Attachments
Last edited:

